OpenWrt访客WiFi植入广告

好吧,这确实是一个很奇怪的需求。

1.设置访客WiFi

http://www.right.com.cn/forum/thread-173844-1-1.html

其中网络接口的IP地址设置为172.16.68.1

2.配置Privoxy

Privoxy是一款不进行网页缓存且自带过滤功能的代理服务器,针对HTTP、HTTPS协议。通过其过滤功能,用户可以保护隐私、对网页内容进行过滤、管理Cookie,以及拦阻各种广告等。Privoxy可以单机使用,也可以应用到多用户的网络。它也可以与其他代理相连,更可以突破互联网审查。

安装privoxy:

opkg install privoxy

配置privoxy:

cd /etc/privoxy/
vi config

编辑config

高亮行为需要添加/修改的

confdir /etc/privoxy
logdir /var/log
filterfile default.filter
filterfile user.filter
logfile privoxy
actionsfile match-all.action # Actions that are applied to all sites and maybe overruled later on.
actionsfile default.action   # Main actions file
actionsfile user.action      # User customizations
listen-address  172.16.68.1:8118
toggle  1
enable-remote-toggle  1
enable-remote-http-toggle  0
enable-edit-actions 1
enforce-blocks 0
buffer-limit 4096
forwarded-connect-retries  0
accept-intercepted-requests 1
allow-cgi-request-crunching 0
split-large-forms 0
keep-alive-timeout 300
socket-timeout 300
permit-access  172.16.68.0/24
debug   1    # show each GET/POST/CONNECT request
debug   4096 # Startup banner and warnings
debug   8192 # Errors - *we highly recommended enabling this*
#admin-address [email protected]
#proxy-info-url http://www.example.com/proxy-service.html

user.filter中添加要注入的脚本:

FILTER: guest-wifi
s|</head>|<script type="text/javascript" src="http://example.com/ad.js"></script>$0|

user.action中调用user.filter的规则:

{+filter{guest-wifi}}
.*

3.将流量转发到Privoxy

下面的指令会将所有来自172.16.68.*,访问80端口的请求转发到位于8118端口的privoxy:

iptables -t nat -A PREROUTING -s 172.16.68.1/24 -p tcp --dport 80 -j REDIRECT --to-ports 8118

4.后记


  • privoxy会导致访问延迟。
  • privoxy官方文档中明确指出不支持https流量的拦截。

Linux搭建CS:GO服务器

0.前言

本文用到的系统:Ubuntu 16.04 32位

撰写本文时CS:GO服务端的大小约为16G,请确保服务端有足够空间。

1.安装SteamCMD

Steam命令行版客户端(SteamCMD)是一个命令行版本的Steam客户端。它的主要用途是在一个命令行界面的Steam客户端上安装和更新各种可用的专用服务端。它适用于使用SteamPipe内容分发系统的游戏。所有游戏已经从旧的半条命专用服务器更新工具迁移到了SteamCMD。

为steamcmd创建一个用户并切换过去(root用户下):

useradd -m steam
su - steam

创建目录:

mkdir Steam
cd Steam

下载并解压:

curl -sqL 'https://steamcdn-a.akamaihd.net/client/installer/steamcmd_linux.tar.gz' | tar zxvf -

运行:

./steamcmd.sh

等待下载完成,直到出现Steam>,SteamCMD环境安装完成。

2.安装CS:GO

以下指令均在SteamCMD(Steam>)环境下执行

选择安装目录:

(下面的指令将csgo服务器安装在了当前目录下的csgoserver目录,也就是Steam/csgoserver)

force_install_dir ./csgoserver/

匿名登陆:

login anonymous

安装:

app_update 740 validate

(如果需要升级请使用app_update 740,升级前务必选择安装目录

安装完成后,按Ctrl+C退出SteamCMD,然后执行下面的指令即可以休闲模式启动沙漠2服务器:

./csgoserver/srcds_run -game csgo -console -usercon +game_type 0 +game_mode 0 +mapgroup mg_active +map de_dust2

但因为还未关联token,服务器只能通过内网连接。要想通过公网连接并在社区服务器列表中显示出来,你需要申请一个token并填入启动参数。

token申请地址:http://steamcommunity.com/dev/managegameservers

在上面的指令中追加下面的参数即可在公网中启动:

+sv_setsteamaccount 你申请到的token(登陆令牌) -net_port_try 1

另外附上其它几种模式的启动指令:

#休闲模式
./csgoserver/srcds_run -game csgo -console -usercon +game_type 0 +game_mode 0 +mapgroup mg_active +map de_dust2
#竞技模式
./csgoserver/srcds_run -game csgo -console -usercon +game_type 0 +game_mode 1 +mapgroup mg_active +map de_dust2
#军备竞赛模式
./csgoserver/srcds_run -game csgo -console -usercon +game_type 1 +game_mode 0 +mapgroup mg_armsrace +map ar_shoots
#爆破模式
./csgoserver/srcds_run -game csgo -console -usercon +game_type 1 +game_mode 1 +mapgroup mg_demolition +map de_lake
#死亡竞赛模式
./csgoserver/srcds_run -game csgo -console -usercon +game_type 1 +game_mode 2 +mapgroup mg_allclassic +map de_dust

所有游戏类型和模式都可以在./csgoserver/csgo/gamemodes.txt中找到

3.连接至服务器

开始游戏 – 浏览社区服务器 – 收藏夹 – 添加服务器 – 输入你服务器的公网IP地址

如果是在家开服请自行搜索端口映射相关教程。

4.长久运行

如果需要长久运行服务器,请使用screen。没有安装的可以使用下面的指令安装(root用户下):

apt install screen

在启动CSGO之前运行screen -S csgoserver,然后启动CSGO。接着你就可以关闭终端,服务端会继续在远程服务器上运行。

当你需要操作服务端时,运行screen -r csgoserver,便会回到服务端进程中去。

5.可能遇到的错误

  • Failed to open dedicated.so (libstdc++.so.6: cannot open shared object file: No such file or directory)

需要安装lib32stdc++6包,使用下面的命令来安装:

apt install lib32stdc++6

解决Chrome辅助框架CPU占用过多

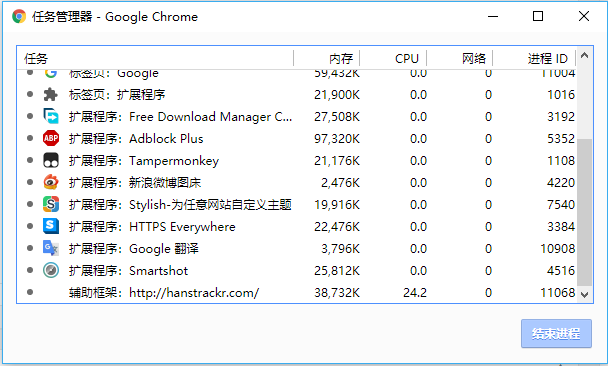
最近无意中发现chrome在仅开启一个标签页的情况下也有相当可观的cpu占用,

遂打开任务管理器查看,发现一个名叫“辅助框架”的进程:

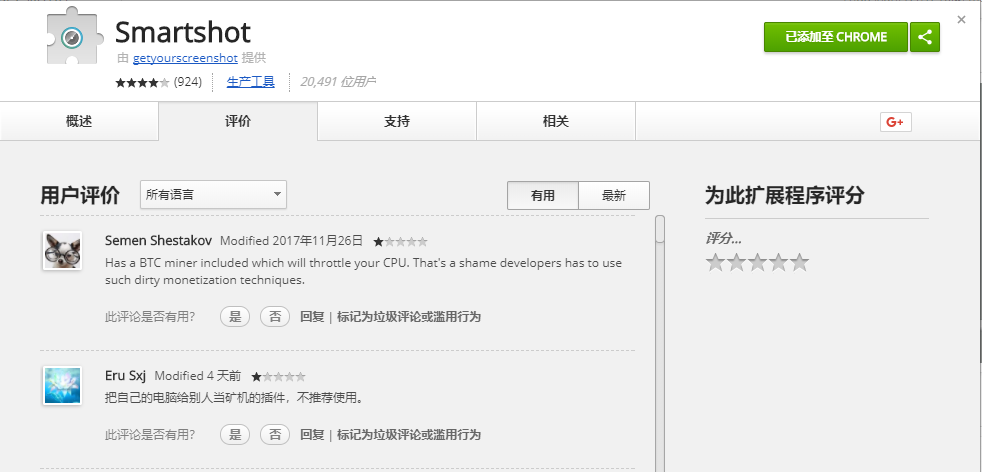
该进程并没有写明属于哪个插件,于是只好一个一个排除。最后发现在禁用Smartshot后cpu占用恢复了正常,可以确定该作者无良的植入了挖矿相关的代码。

商店的评论证实了这一点